
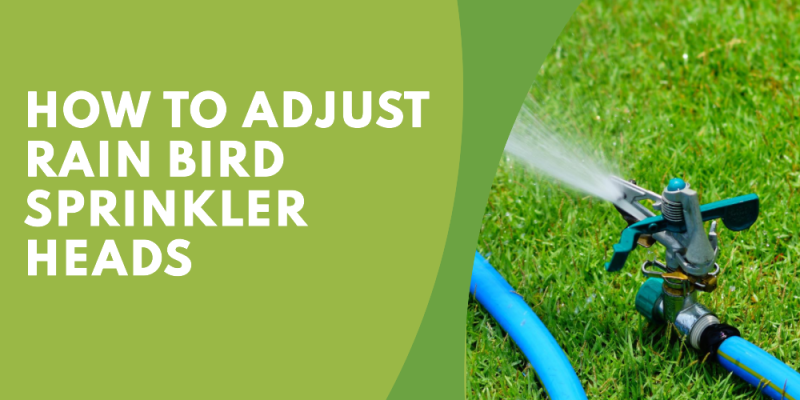
Rain Bird is a trusted name in the lawn and garden irrigation industry. Their sprinkler heads are known for reliability and efficiency. However, like all sprinkler systems, occasional adjustments are necessary to ensure optimal watering. Whether you’re experiencing over-spraying, dry spots, or simply changing your landscape, adjusting your Rain Bird sprinkler heads can make a significant difference. Here’s how to do it.
1. Identify Your Rain Bird Sprinkler Model
Rain Bird produces various sprinkler heads, each with its unique adjustment method. The most common types are:
- Pop-up spray heads: Used in smaller grassy areas.
- Rotor heads: Used for larger lawns and have a rotating stream of water.
- Impact rotor heads: Older models with a mechanical operation that makes a distinctive “clicking” sound.
2. Gather Necessary Tools
Most Rain Bird sprinkler heads require:
- A flat-head screwdriver.
- A Rain Bird adjustment tool (especially for certain rotor models).
3. Adjusting Pop-up Spray Heads
- Change the Spray Pattern: Locate the tiny slot on top of the spray nozzle. Using your flat-head screwdriver, turn it clockwise to decrease the spray pattern or counterclockwise to increase it.
- Adjust the Spray Distance: At the base of the nozzle, there’s a screw. By turning this screw clockwise, you reduce the spray distance. Turning it counterclockwise will increase the distance.
4. Adjusting Rotor Heads
- Set the Left Edge: Rotate the turret (the part that moves when the sprinkler is operating) all the way to the right, then back to the left. This sets your left edge.
- Adjust the Spray Pattern: Insert the Rain Bird adjustment tool or flat-head screwdriver into the adjustment socket. Turn it clockwise to decrease the arc or counterclockwise to increase it.
- Modify the Spray Distance: On top of the rotor, you’ll find a screw. Adjusting this screw will either increase or decrease the spray distance.
5. Adjusting Impact Rotor Heads
- Set the Right and Left Limits: There are two trip points on the sprinkler’s collar. By physically moving these, you can set the right and left watering limits.
- Change the Spray Distance: The screw located on top of the sprinkler head can be adjusted to increase or decrease the spray distance.
6. Test and Fine-tune
After making adjustments, run your sprinkler system to ensure the desired coverage. It may take a few tries to get it just right, so be patient and make minor tweaks as necessary.
7. Regular Maintenance
Regularly inspect your Rain Bird sprinkler heads for dirt or debris, which can affect performance. Clean as necessary and make adjustments to accommodate any changes in your landscape or watering needs.
Conclusion
Adjusting Rain Bird sprinkler heads is a straightforward process, but it requires attention to detail. Regular checks and tweaks will ensure your lawn and garden receive optimal hydration, keeping them lush and vibrant. Remember, investing time in understanding your irrigation system will save water, money, and promote a healthier landscape.


Comments